This last week I was fortunate to” catch” the northern lights and make some awesome photographs. Actually if you want to photograph the aurora borealis it requires good planning, patience, and a significant amount of luck.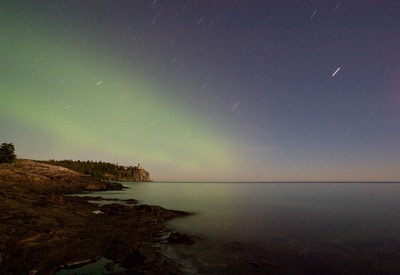
Aurora Borealis is named after the Roman Goddess of Dawn (Aurora) and the Greek term for northern wind (Boreas.) The aurora borealis is caused by the ionization of nitrogen atoms in the atmosphere, this ionization occurs as a result of solar flares or solar storms that pass through the earth’s atmosphere. The conditions for the aurora borealis are most prominent near the fall and spring equinoxes. Some researchers believe we are entering a period of increased activity for the aurora.
The aurora borealis is only visible at night typically from 10pm to 2am. Best displays are seen away from the lights of a town or city, and ideally when the moon is not out. For more information about the aurora go to the
Geophysical Institute, or the NOAAweb site. These web sites have lots of information about the northern lights in addition to forecast features which attempt to forecast when the displays are at their best. Keep in mind that any forecast is like trying to forecast weather–or more accurately even more challenging because scientists know less about the phenomenon than they do about weather conditions.
Camera Technique: Photographically speaking you will need a good camera with a semi-wide or wide angle lens, a sturdy tripod, and a cable release. Ideally your lens is f4 or faster. The intensity of the display will determine your exposure. In order to capture or “freeze” the shapes of the light-glow you will want to use as fast a shutter speed as possible. Set the ISO on your camera to 800 or faster, noise is an issue. Set the aperture of your lens at it’s most open setting; ie f4 or f2.8. Set your shutter speed to the “BULB” setting. Your exposures may range anywhere from 10 seconds up to several minutes depending upon the intensity of the display. Make a test exposure and check your histogram then adjust your exposure accordingly.
Focus–trying to focus at night is the tricky part. Here are some tips: get to your location early enough to focus on the horizon or other feature in the foreground, remember to turn the auto focus off once you have focused. Use a flash light to shine on a prominent object and focus on that object. If your camera is equipped with Live- View you can pick an object and zoom into that object. Finally you can shoot a test image and then preview it and zoom in to check your focus adjusting as necessary.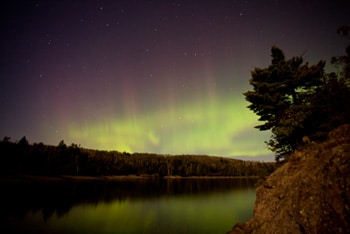
Vantage Point: where you go to photograph the northern lights will take a little planning. Optimally you need a clear view of the north horizon, and preferably one that is well away from city light shine. The less light shine the better the display will appear. A tree or some other prominent feature in the foreground helps to place the lights in a context with the landscape. Viewing over a lake or other open water will add reflections and interest to the image.
Post processing: shoot in camera RAW. You will have more lee-way to process the image and fine-tune the exposure and noise effects. If you are not familiar with how to post process your images consider taking a print-making workshop.